Pages

Saturday, December 23, 2017

Joy to the world...

Hello Everyone!

It's Sue here today to show you how to create a really quick, simple and very pretty background with your copic markers.

You will need a stamped image, (I have used the beautiful 
Christmas Horns ), copic markers and some colourless blender in a spritzer bottle.
First I coloured the background around the image with
RV93 - it doesn't need to be too neat.
Then, the rest of the background was coloured with RV91.
Then I sprayed the entire design with colourless blender.
The colourless blender creates a lovely dotty pattern on the coloured background.  It doesn't matter that it goes on the image too as it will dry leaving you able to colour the image as usual.  Don't worry about the blender making larger blots as it looks really pretty when it is dry.  (I took the picture below while the blender was still wet so you can see the effect)

I carried on colouring the image with markers as shown - 
silver horns C0, C1, C3, C4
...bow with R35, R37, R56, R59.
...holly leaves with YG03, YG63, G85 and BG99
...frame with R35, R37, R56
Finally I added some Clear and Silver Copic Glitter pen to the horns.  This does n't show very well in the photo but it does look really sparkly!
...and here is my finished card.
This beautiful image is 
It is available in the UK from 

Thank you for popping by.
Happy Copic colouring
from Sue...xxx

...and thank you so much to you all for your support for my projects this year.
I hope you enjoy a very special holiday season.

Thursday, December 14, 2017

Spring Bouquet

Hi everyone, Dorinda here today.
I'm totally ready for some spring flowers and this DoveArt Studios image called
is perfect.


I stamped it off with light grey ink so that i could enhance the delicacy of the flowers.
Then, I lay down an under painting with copics. BV00, YG03 and Y00
Finally, I took a few colored pencils to emphasize the line divisions; adding a bit of greyed lavender to the shadows.
Super simple and perfect for any occasion.

Hope you all have a blessed Holiday.

Hugs,
Dorinda

Thursday, November 23, 2017

Thimble and Thread

It's Barbara here sharing part of a project I made using Thimble and Thread. When I cut the image out, I didn't want fussy cut around the thread but I didn't want all the white in there too.  So I decided to cut it off and thread it for real instead. I used a craft knife to cut the eye of the needle then use Baker's twine for the thread.


Here are the Copic markers I used:

YG11, 25, 63
R37, 14, 02
E31, 23, 34
T1, 3, 5, BV23


Sunday, November 5, 2017

Hot Sip

This is Barbara here and I have a project to share using Hot Sip. I altered the look a little by adding a face to her and to give her some character. The Copic colors I used are listed below and more details can be found on my blog. Have a great cuppa!


YG25, 13, 01, 00, G20
BG07, 32, 11
C0, 1, 3, 5, 9
R12, 8, 2, 85, 46
E18, 11, E44

Tuesday, October 17, 2017

Great Horned Owl

Hi there :)

Do you struggle making cards for men? I did until I started using DoveArt Studios rubber stamps as a lot of them lend themselves to male cards just like the Great Horned Owl, so keeping it simple as I like to do I put together this card that I think is ideal for a male's birthday card. What do you think?


Great Horned Owl coloured with Copic Markers - 

Owl - E51, 53, 55, 57, BV20, 23, W7, Y15, 17. Tree - E44, 47, 49, G46.

I used Distressed Oxide ink with a sponge and a small 'grass' rubber stamp for the background. 

Until next time, have a wonderful day 

Andrea xx 


Sunday, October 15, 2017

Tall Cactus!

Hello friends,

How are you today? I'm here to share my latest DoveArt Studios creation :)

It's a clean and simple card featuring 'Tall Cactus' rubber stamp. I've made this card with my step Dad in mind as he is a keen gardener.


Tall Cactus was coloured with Copic Markers -

Blues - B91, 93, 97. Greens - YG61,63, 67, 91, 93, 95, 97, BG90, 93, 96. Shadows - W7. 

Thanks for stopping by, have an amazing day

Andrea xx


Friday, October 13, 2017

Oh Christmas Tree

Hello All, Dorinda here with a little coloring.
I've used Christmas Tree from the latest DoveArt Release.
I had a blast coloring this one in no lines technique.
I used my copics to do a wash of under-color; 
then added some prisma pencil on top.
The Prismas were used specifically with a sharp point to do the pine.
I added Spica blue on the light string and a bit of shimmer on the bulbs
with glitter pen


Tuesday, September 19, 2017

Merry Christmas...

Hello everyone,
It's Sue here today.

(Beware, cuteness overload coming up)!

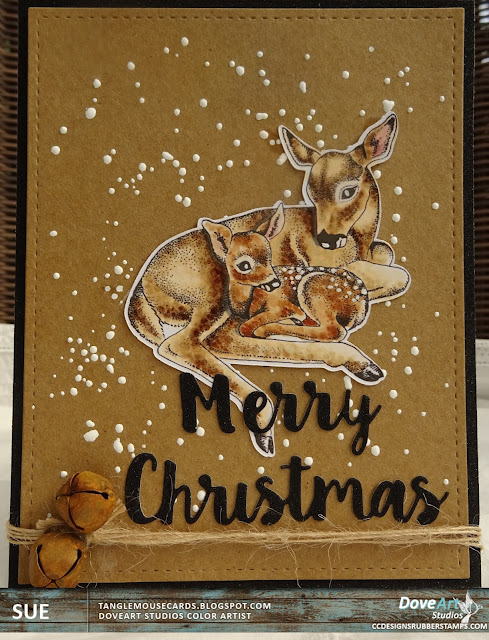
I decided it was time I made a start on Christmas cards, and as my favourite subject for these is any sort of deer, I could n't resist this beautiful image -
I coloured this gorgeous image with Copics and set it on a kraft card background sprinkled with Chunky White Embossing Enamel.
I added a die cut Christmas sentiment - the card is black glitter card but sadly it does n't really show up!
Finally I added some twine and rusty bells and fixed the design to another piece of black glitter card.
Inks used -
Copics -
Doe - E50, E51, E53, E55, E57,
Fawn - E30, E31, E34, E35, E37, E39
Ears E04, R21, R11, W00
Thank you for popping by...
Happy Creating
from Sue ...xxx

Monday, August 28, 2017

Beach Scene

Howdy, this is Barbara and here's my latest project featuring Beach Scene rubber stamp by DoveArt Studios. You'll find more details on my blog and below are the colors I used.


Here are the Copic colors I used on this:
B0000, 00, 02 
BG000, 11, 72
YG93, T2
R00, 14, 39
YR01, 15, Y26
E50, 53, 43

Saturday, August 5, 2017

Christmas Tree

 It is that time to start whipping those holiday cards up (I know it's August...don't shoot the messenger).   This is really easy to create and I had fun with a non-traditional Christmas color combo.

C.C.Designs HERE or LMMS HERE both sell DoveArt Studios stamps online.  Did you know CCDesigns is the manufacturer of the DoveArts Studio line and your local stores can carry the DoveArt Studios line of stamps?

Here is the tutorial on how I made the gold buttons for this card if you are interested INSTRUCTIONS

Copics:
BG34 BV20 B04 RV19 RV34 YG03 YG17

Friday, August 4, 2017

Trees Silhouette

This is Barbara and I'm sharing a card I made using the new Trees Silhouette. The colors are listed below and you can fine more details on my blog ForgottenScraps.


These are the Copic markers that I used on Trees Silhouette... 

BG11, B12, 34, 97
white gel pen

Wednesday, July 26, 2017

Witch way is the Candy?

Hello everyone.

Sue here today with a lovely surprise!

Betchya weren't expecting to see a fabulous new holiday release from
DoveArt Studios ( ;

I have been lucky enough to have the new release stamp
Trees Silhouette 
to create something with to hopefully inspire you!

I LOVE this stamp - the possibilities for making something scrummy are endless!

I have made two projects for you...


Witches in a whizz! Who knew!?
Ingredients
DoveArt Studios Trees Silhouette 
Impression Obsession Six Witches Die Set (Dies To Die For)
MFT Die namics Scalloped Stitched Frame (Dies To Die For)
Cheery Lynn Bat Family Die Set
Black Organza Ribbon
Authentique Thrilling 6 x 6 Paper pad (Dies To Die For)
Tim Holtz Distress Inks in Antique Linen, Victorian Velvet, Seedless Preserves, Chipped Sapphire and Peacock Feathers
Sentiment made on Computer


I really love this one!
Ingredients
DoveArt Studios Trees Silhouette 

Deer Silhouette Stamp by Alesa Baker Designs for Impression Obsession
Versafine Ink in Onyx Black
Black Cardstock
Fran-tage Chunky White Embossing Enamel by Stampendous
Tim Holtz Distress Ink Pads in Tumbled Glass, Broken China, Chipped Sapphire Black Soot and Weathered Wood 
Lawn Fawn Winter Big Scripty Words Stamp and Die Set.
Archival Ink in Cobalt
Ribbon

Thank you for popping by...
Happy Creating
from Sue ...xxx