Pages

Showing posts with label Sue Hastead. Show all posts

Saturday, December 23, 2017

Joy to the world...

Hello Everyone!

It's Sue here today to show you how to create a really quick, simple and very pretty background with your copic markers.

You will need a stamped image, (I have used the beautiful 
Christmas Horns ), copic markers and some colourless blender in a spritzer bottle.
First I coloured the background around the image with
RV93 - it doesn't need to be too neat.
Then, the rest of the background was coloured with RV91.
Then I sprayed the entire design with colourless blender.
The colourless blender creates a lovely dotty pattern on the coloured background.  It doesn't matter that it goes on the image too as it will dry leaving you able to colour the image as usual.  Don't worry about the blender making larger blots as it looks really pretty when it is dry.  (I took the picture below while the blender was still wet so you can see the effect)

I carried on colouring the image with markers as shown - 
silver horns C0, C1, C3, C4
...bow with R35, R37, R56, R59.
...holly leaves with YG03, YG63, G85 and BG99
...frame with R35, R37, R56
Finally I added some Clear and Silver Copic Glitter pen to the horns.  This does n't show very well in the photo but it does look really sparkly!
...and here is my finished card.
This beautiful image is 
It is available in the UK from 

Thank you for popping by.
Happy Copic colouring
from Sue...xxx

...and thank you so much to you all for your support for my projects this year.
I hope you enjoy a very special holiday season.

Tuesday, September 19, 2017

Merry Christmas...

Hello everyone,
It's Sue here today.

(Beware, cuteness overload coming up)!

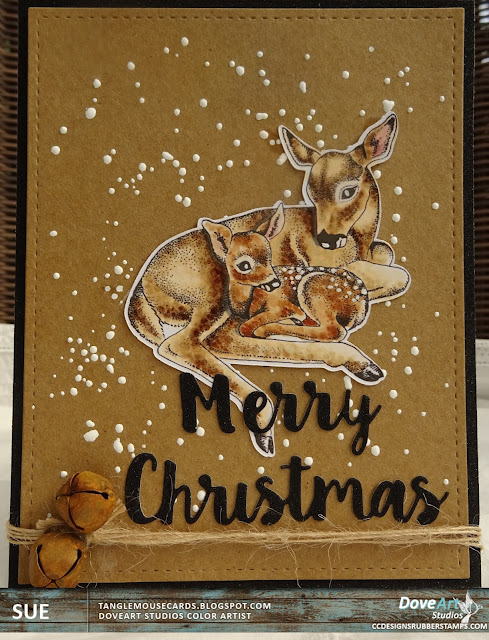
I decided it was time I made a start on Christmas cards, and as my favourite subject for these is any sort of deer, I could n't resist this beautiful image -
I coloured this gorgeous image with Copics and set it on a kraft card background sprinkled with Chunky White Embossing Enamel.
I added a die cut Christmas sentiment - the card is black glitter card but sadly it does n't really show up!
Finally I added some twine and rusty bells and fixed the design to another piece of black glitter card.
Inks used -
Copics -
Doe - E50, E51, E53, E55, E57,
Fawn - E30, E31, E34, E35, E37, E39
Ears E04, R21, R11, W00
Thank you for popping by...
Happy Creating
from Sue ...xxx

Wednesday, July 26, 2017

Witch way is the Candy?

Hello everyone.

Sue here today with a lovely surprise!

Betchya weren't expecting to see a fabulous new holiday release from
DoveArt Studios ( ;

I have been lucky enough to have the new release stamp
Trees Silhouette 
to create something with to hopefully inspire you!

I LOVE this stamp - the possibilities for making something scrummy are endless!

I have made two projects for you...


Witches in a whizz! Who knew!?
Ingredients
DoveArt Studios Trees Silhouette 
Impression Obsession Six Witches Die Set (Dies To Die For)
MFT Die namics Scalloped Stitched Frame (Dies To Die For)
Cheery Lynn Bat Family Die Set
Black Organza Ribbon
Authentique Thrilling 6 x 6 Paper pad (Dies To Die For)
Tim Holtz Distress Inks in Antique Linen, Victorian Velvet, Seedless Preserves, Chipped Sapphire and Peacock Feathers
Sentiment made on Computer


I really love this one!
Ingredients
DoveArt Studios Trees Silhouette 

Deer Silhouette Stamp by Alesa Baker Designs for Impression Obsession
Versafine Ink in Onyx Black
Black Cardstock
Fran-tage Chunky White Embossing Enamel by Stampendous
Tim Holtz Distress Ink Pads in Tumbled Glass, Broken China, Chipped Sapphire Black Soot and Weathered Wood 
Lawn Fawn Winter Big Scripty Words Stamp and Die Set.
Archival Ink in Cobalt
Ribbon

Thank you for popping by...
Happy Creating
from Sue ...xxx